
Apache Phoenix is a relatively new open source Java project that provides a JDBC driver and SQL access to Hadoop’s NoSQL database: HBase. It was created as an internal project at Salesforce, open sourced on GitHub, and became a top-level Apache project in May 2014. If you have strong SQL programming skills and would like to be able to use them with a powerful NoSQL database, Phoenix could be exactly what you’re looking for!
This installment of Open source Java projects introduces Java developers to Apache Phoenix. Since Phoenix runs on top of HBase, we’ll start with an overview of HBase and how it differs from relational databases. You’ll learn how Phoenix bridges the gap between SQL and NoSQL, and how it’s optimized to efficiently interact with HBase. With those basics out of the way, we’ll spend the remainder of the article learning how to work with Phoenix. You’ll set up and integrate HBase and Phoenix, create a Java application that connects to HBase through Phoenix, and you’ll write your first table, insert data, and run a few queries on it.
HBase: A primer
Apache HBase is a NoSQL database that runs on top of Hadoop as a distributed and scalable big data store. HBase is a column-oriented database that leverages the distributed processing capabilities of the Hadoop Distributed File System (HDFS) and Hadoop’s MapReduce programming paradigm. It was designed to host large tables with billions of rows and potentially millions of columns, all running across a cluster of commodity hardware.
Apache HBase combines the power and scalability of Hadoop with the ability to query for individual records and execute MapReduce processes.
In addition to capabilities inherited from Hadoop, HBase is a powerful database in its own right: it combines real-time queries with the speed of a key/value store, a robust table-scanning strategy for quickly locating records, and it supports batch processing using MapReduce. As such, Apache HBase combines the power and scalability of Hadoop with the ability to query for individual records and execute MapReduce processes.
HBase’s data model
HBase organizes data differently from traditional relational databases, supporting a four-dimensional data model in which each “cell” is represented by four coordinates:
- Row key: Each row has a unique row key that is represented internally by a byte array, but does not have any formal data type.
- Column family: The data contained in a row is partitioned into column families; each row has the same set of column families, but each column family does not need to maintain the same set of column qualifiers. You can think of column families as being similar to tables in a relational database.
- Column qualifier: These are similar to columns in a relational database.
- Version: Each column can have a configurable number of versions. If you request the data contained in a column without specifying a version then you receive the latest version, but you can request older versions by specifying a version number.
Figure 1 shows how these four dimensional coordinates are related.
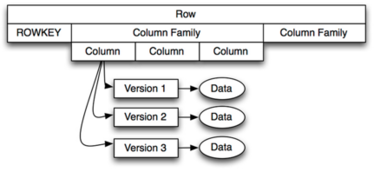
The model in Figure 1 shows that a row is comprised of a row key and an arbitrary number of column families. Each row key is associated to a collection of “rows in tables,” each of which has its own columns. While each table must exist, the columns in tables may be different across rows. Each column family has a set of columns, and each column has a set of versions that map to the actual data in the row.
If we were modeling a person, the row key might be the person’s social security number (to uniquely identify them), and we might have column families like address, employment, education, and so forth. Inside the address column family we might have street, city, state, and zip code columns, and each version might correspond to where the person lived at any given time. The latest version might list the city “Los Angeles,” while the previous version might list “New York.” You can see this example model in Figure 2.
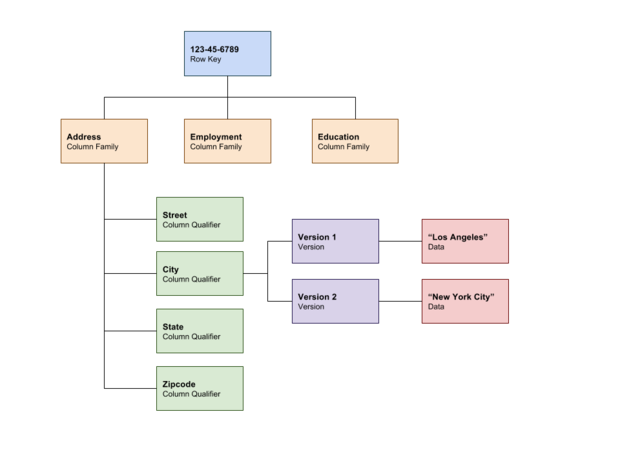
Figure 2. Person model in HBase
In sum, HBase is a column-oriented database that represents data in a four dimensional model. It is built on top of the Hadoop Distributed File System (HDFS), which partitions data across potentially thousands of commodity machines. Developers using HBase can access data directly by accessing a row key, by scanning across a range of row keys, or by using batch processing via MapReduce.
Bridging the NoSQL gap: Apache Phoenix
Apache Phoenix is a top-level Apache project that provides an SQL interface to HBase, mapping HBase models to a relational database world. Of course, HBase provides its own API and shell for performing functions like scan, get, put, list, and so forth, but more developers are familiar with SQL than NoSQL. The goal of Phoenix is to provide a commonly understood interface for HBase.
In terms of features, Phoenix does the following:
- Provides a JDBC driver for interacting with HBase.
- Supports much of the ANSI SQL standard.
- Supports DDL operations such as CREATE TABLE, DROP TABLE, and ALTER TABLE.
- Supports DML operations such as UPSERT and DELETE.
- Compiles SQL queries into native HBase scans and then maps the response to JDBC ResultSets.
- Supports versioned schemas.
In addition to supporting a vast set of SQL operations, Phoenix is also very high performing. It analyzes SQL queries, breaks them down into multiple HBase scans, and runs them in parallel, using the native API instead of MapReduce processes.
Phoenix uses two strategies–co-processors and custom filters–to bring computations closer to the data:
- Co-processors perform operations on the server, which minimizes client/server data transfer.
- Custom filters reduce the amount of data returned in a query response from the server, which further reduces the amount of transferred data. Custom filters are used in a few ways:
- When executing a query, a custom filter can be used to identify only the essential column families required to satisfy the search.
- A skip scan filter uses HBase’s SEEK_NEXT_USING_HINT to quickly navigate from one record to the next, which speeds up point queries.
- A custom filter can “salt the data,” meaning that it adds a hash byte at the beginning of row key so that it can quickly locate records.
In sum, Phoenix leverages direct access to HBase APIs, co-processors, and custom filters to give you millisecond-level performance for small datasets and second-level performance for humongous ones. Above all, Phoenix exposes these capabilities to developers via a familiar JDBC and SQL interface.
Get started with Phoenix
In order to use Phoenix, you need to download and install both HBase and Phoenix. You can find the Phoenix download page (and HBase compatibility notes) here.
Download and setup
At the time of this writing, the latest version of Phoenix is 4.6.0 and the download page reads that 4.x is compatible with HBase version 0.98.1+. For my example, I downloaded the latest version of Phoenix that is configured to work with HBase 1.1. You can find it in the folder: phoenix-4.6.0-HBase-1.1/.
Here’s the setup:
- Download and decompress this archive and then use one of the recommended mirror pages here to download HBase. For instance, I selected a mirror, navigated into the 1.1.2 folder, and downloaded
hbase-1.1.2-bin.tar.gz. - Decompress this file and create an
HBASE_HOMEenvironment variable that points to it; for example, I added the following to my~/.bash_profilefile (on Mac):export HBASE_HOME=/Users/shaines/Downloads/hbase-1.1.2.
Integrate Phoenix with HBase
The process to integrate Phoenix into HBase is simple:
- Copy the following file from the Phoenix root directory to the HBase
libdirectory:phoenix-4.6.0-HBase-1.1-server.jar. - Start HBase by executing the following script from HBase’s
bindirectory:./start-hbase.sh. - With HBase running, test that Phoenix is working by executing the SQLLine console, by executing following command from Phoenix’s
bindirectory:./sqlline.py localhost.
The SQLLine console
sqlline.py is a Python script that starts a console that connects to HBase’s Zookeeper address; localhost in this case. You can walk through an example that I am going to summarize in this section here.
First, let’s view all of the tables in HBase by executing !table:
0: jdbc:phoenix:localhost> !tables
+------------------------------------------+------------------------------------------+------------------------------------------+------------------------------------------+--------------------------+
|                TABLE_CAT                 |               TABLE_SCHEM                |                TABLE_NAME                |                TABLE_TYPE                |                 REMARKS  |
+------------------------------------------+------------------------------------------+------------------------------------------+------------------------------------------+--------------------------+
|                                          | SYSTEM                                   | CATALOG                                  | SYSTEM TABLE                             |                          |
|                                          | SYSTEM                                   | FUNCTION                                 | SYSTEM TABLE                             |                          |
|                                          | SYSTEM                                   | SEQUENCE                                 | SYSTEM TABLE                             |                          |
|                                          | SYSTEM                                   | STATS                                    | SYSTEM TABLE                             |                          |
+------------------------------------------+------------------------------------------+------------------------------------------+------------------------------------------+--------------------------+
Because this is a new instance of HBase the only tables that exist are system tables. You can create a table by executing a create table command:
0: jdbc:phoenix:localhost> create table test (mykey integer not null primary key, mycolumn varchar);
No rows affected (2.448 seconds)
This command creates a table named test, with an integer primary key named mykeyand a varchar column named mycolumn. Now insert a couple rows by using the upsertcommand:
0: jdbc:phoenix:localhost> upsert into test values (1,'Hello');
1 row affected (0.142 seconds)
0: jdbc:phoenix:localhost> upsert into test values (2,'World!');
1 row affected (0.008 seconds)
UPSERT is an SQL command for inserting a record if it does not exist or updating a record if it does. In this case, we inserted (1,’Hello’) and (2,’World!’). You can find the complete Phoenix command reference here. Finally, query your table to see the values that you upserted by executing select * from test:
0: jdbc:phoenix:localhost> select * from test;

+------------------------------------------+------------------------------------------+
|                  MYKEY                   |                 MYCOLUMN                 |
+------------------------------------------+------------------------------------------+
| 1                                        | Hello                                    |
| 2                                        | World!                                   |
+------------------------------------------+------------------------------------------+
2 rows selected (0.111 seconds)
As expected, you’ll see the values that you just inserted. If you want to clean up the table, execute a drop table test command.
Java programming with Phoenix
Connecting to and interacting with HBase through Phoenix is as simple as connecting to any database using a JDBC driver:
- Add the JDBC driver to your
CLASSPATH. - Use the
DriverManagerto obtain a connection to the database. - Execute queries against the database.
I have uploaded the source code for this example to GitHub. I first set up a new Maven project and configured my POM file as shown in Listing 1.
Listing 1. pom.xml
<project xmlns="http://maven.apache.org/POM/4.0.0" xmlns:xsi="http://www.w3.org/2001/XMLSchema-instance"
         xsi:schemaLocation="http://maven.apache.org/POM/4.0.0 http://maven.apache.org/maven-v4_0_0.xsd">
    <modelVersion>4.0.0</modelVersion>
    <groupId>com.geekcap.javaworld</groupId>
    <artifactId>phoenix-example</artifactId>
    <packaging>jar</packaging>
    <version>1.0-SNAPSHOT</version>
    <name>phoenix-example</name>
    <url>http://maven.apache.org</url>

    <properties>
        <java.version>1.6</java.version>
        <project.build.sourceEncoding>UTF-8</project.build.sourceEncoding>
    </properties>

    <dependencies>
        <dependency>
            <groupId>org.apache.phoenix</groupId>
            <artifactId>phoenix-core</artifactId>
            <version>4.6.0-HBase-1.1</version>
        </dependency>
        <dependency>
            <groupId>junit</groupId>
            <artifactId>junit</artifactId>
            <version>4.11</version>
            <scope>test</scope>
        </dependency>
    </dependencies>

    <build>
        <plugins>
            <plugin>
                <groupId>org.apache.maven.plugins</groupId>
                <artifactId>maven-compiler-plugin</artifactId>
                <version>2.0.2</version>
                <configuration>
                    <source>${java.version}</source>
                    <target>${java.version}</target>
                </configuration>
            </plugin>
            <plugin>
                <groupId>org.apache.maven.plugins</groupId>
                <artifactId>maven-jar-plugin</artifactId>
                <configuration>
                    <archive>
                        <manifest>
                            <addClasspath>true</addClasspath>
                            <classpathPrefix>lib/</classpathPrefix>
                            <mainClass>com.geekcap.javaworld.phoenixexample.PhoenixExample</mainClass>
                        </manifest>
                    </archive>
                </configuration>
            </plugin>
            <plugin>
                <groupId>org.apache.maven.plugins</groupId>
                <artifactId>maven-dependency-plugin</artifactId>
                <executions>
                    <execution>
                        <id>copy</id>
                        <phase>install</phase>
                        <goals>
                            <goal>copy-dependencies</goal>
                        </goals>
                        <configuration>
                            <outputDirectory>${project.build.directory}/lib</outputDirectory>
                        </configuration>
                    </execution>
                </executions>
            </plugin>
        </plugins>
    </build>
</project>
This POM file imports the Phoenix Core Maven dependency, which provides access to the Phoenix JDBC driver:
<dependency>
            <groupId>org.apache.phoenix</groupId>
            <artifactId>phoenix-core</artifactId>
            <version>4.6.0-HBase-1.1</version>
        </dependency>
The POM file does some housekeeping work next: it sets the source compilation to Java 6, specifies that dependencies should be copied to the target/lib folder during the build, and makes the resulting JAR file executable for the main class,com.geekcap.javaworld.phoenixexample.PhoenixExample.
Listing 2 shows the source code for the PhoenixExample class.
Listing 2. PhoenixExample.java
package com.geekcap.javaworld.phoenixexample;

import java.sql.*;

public class PhoenixExample {

    public static void main(String[] args) {
        // Create variables
        Connection connection = null;
        Statement statement = null;
        ResultSet rs = null;
        PreparedStatement ps = null;

        try {
            // Connect to the database
            connection = DriverManager.getConnection("jdbc:phoenix:localhost");

            // Create a JDBC statement
            statement = connection.createStatement();

            // Execute our statements
            statement.executeUpdate("create table javatest (mykey integer not null primary key, mycolumn varchar)");
            statement.executeUpdate("upsert into javatest values (1,'Hello')");
            statement.executeUpdate("upsert into javatest values (2,'Java Application')");
            connection.commit();

            // Query for table
            ps = connection.prepareStatement("select * from javatest");
            rs = ps.executeQuery();
            System.out.println("Table Values");
            while(rs.next()) {
                Integer myKey = rs.getInt(1);
                String myColumn = rs.getString(2);
                System.out.println("\tRow: " + myKey + " = " + myColumn);
            }
        }
        catch(SQLException e) {
            e.printStackTrace();
        }
        finally {
            if(ps != null) {
                try {
                    ps.close();
                }
                catch(Exception e) {}
            }
            if(rs != null) {
                try {
                    rs.close();
                }
                catch(Exception e) {}
            }
            if(statement != null) {
                try {
                    statement.close();
                }
                catch(Exception e) {}
            }
            if(connection != null) {
                try {
                    connection.close();
                }
                catch(Exception e) {}
            }
        }
    }
}
Listing 2 first creates a database connection by passing jdbc:phoenix:localhost as the JDBC URL to the DriverManager class, as shown here:
connection = DriverManager.getConnection("jdbc:phoenix:localhost");Just like in the shell console, localhost refers to the server running Zookeeper. If you were connecting to a production HBase instance, you would want to use the Zookeeper server name or IP address for that production instance. With ajavax.sql.Connection, the rest of the example is simple JDBC code. The steps are as follows:
- Create a
Statementfor the connection. - Execute a series of statements using the
executeUpdate()method. - Create a
PreparedStatementto select all the data that we inserted. - Execute the
PreparedStatement, retrieve aResultSet, and iterate over the results.
You can build the project as follows: mvn clean install.
Then execute it with the following command from the target directory:
java -jar phoenix-example-1.0-SNAPSHOT.jarYou should see output like the following (note that I excluded the Log4j warning messages):
Table Values Row: 1 = Hello Row: 2 = Java Application You can also verify this from the Phoenix console. First execute a !tables command to view the tables and observe that JAVATEST is there:
0: jdbc:phoenix:localhost> !tables


+------------------------------------------+------------------------------------------+------------------------------------------+------------------------------------------+--------------------------+
|                TABLE_CAT                 |               TABLE_SCHEM                |                TABLE_NAME                |                TABLE_TYPE                |                 REMARKS  |
+------------------------------------------+------------------------------------------+------------------------------------------+------------------------------------------+--------------------------+
|                                          | SYSTEM                                   | CATALOG                                  | SYSTEM TABLE                             |                          |
|                                          | SYSTEM                                   | FUNCTION                                 | SYSTEM TABLE                             |                          |
|                                          | SYSTEM                                   | SEQUENCE                                 | SYSTEM TABLE                             |                          |
|                                          | SYSTEM                                   | STATS                                    | SYSTEM TABLE                             |                          |
|                                          |                                          | JAVATEST                                 | TABLE                                    |                          |
+------------------------------------------+------------------------------------------+------------------------------------------+------------------------------------------+--------------------------+
Finally, query the JAVATEST table to see your data:
0: jdbc:phoenix:localhost> select * from javatest;

+------------------------------------------+------------------------------------------+
|                  MYKEY                   |                 MYCOLUMN                 |
+------------------------------------------+------------------------------------------+
| 1                                        | Hello                                    |
| 2                                        | Java Application                         |
+------------------------------------------+------------------------------------------+
Note that if you want to run this example multiple times you will want to drop the table using either the console or by adding the following to the end of Listing 2:
statement.executeUpdate("drop table javatest")As you can see, using Phoenix is a simple matter of creating JDBC connection and using the JDBC APIs. With this knowledge you should be able to start using Phoenix with more advanced tools like Spring’s JdbcTemplate or any of your other favorite JDBC abstraction libraries!
Conclusion
Apache Phoenix provides an SQL layer on top of Apache HBase that allows you to interact with HBase in a familiar manner. You can leverage the scalability that HBase derives from running on top of HDFS, along with the multi-dimensional data model that HBase provides, and you can do it using familiar SQL syntax. Phoenix also supports high performance by leveraging native HBase APIs rather than MapReduce processes; implementing co-processors to reduce client/server data transfer; and providing custom filters that improve the execution, navigation, and speed of data querying.
Using Phoenix is as simple as adding a JAR file to HBase, adding Phoenix’s JDBC driver to your CLASSPATH, and creating a standard JDBC connection to Phoenix using its JDBC URL. Once you have a JDBC connection, you can use HBase just as you would any other database.
This Open source Java projects tutorial has provided an overview of both HBase and Phoenix, including the specific motivation for developing each of these technologies. You’ve set up and integrated Phoenix and HBase in your local working environment, and learned how to interact with Phoenix using the Phoenix console and through a Java application. With this foundation you should be well prepared to start building applications on top of HBase, using standard SQL.
[Source:- Javaworld]
