Firebase is a Backend-as-a-Administration — BaaS — that began as a YC11 startup and grew up into a cutting edge application improvement stage on Google Cloud Stage.
With Firebase engineers won’t have to oversee servers or compose APIs (for less perplexing ventures). Firebase is your server, your Programming interface and your datastore, all composed so conventionally that you can adjust it to suit most necessities. You’ll incidentally have to involve different pieces of the Google Cloud innovations for your high level applications. Firebase can’t be everything to everyone. Yet, it gets very close. Anyway we will not be zeroing in on the elements of Firebase here, assuming that you might want to find out about it, how it works and what it offers, you can look at this post here or visit the docs
Contents
What we’ll fabricate
In this post we’ll construct a Portable Blog Application with Android Studio, it will be a fundamental Muck Application with Firebase as the backend data set. Clients will actually want to compose a post (i.e transfer a post picture from your display, compose a Title for the post and give the Substance (Depiction) of the post and afterward present it on Firebase). On effectively presenting on Firebase, the post will be delivered on the landing page where different clients can peruse the post.
Highlights
By the prudence of this post, you’ll get familiar with a couple of different things like
1. Making clients with email and secret key
2. Enrolling and Marking in Clients
3. Logging out endorsed in Clients
4. Writing to and Perusing from information base
5. Erasing information from Firebase inside the application
6. Making Client Profiles and Trimming pictures on transfer
7. Partner Posts with individual proprietors.
Here is a screen capture of the application running on my android gadget, this ought to provide you with a visual portrayal of what we are attempting to accomplish while we feel free to fabricate our Application.
Make the venture
So make another Android Studio project called Blogzone (if you can’t or still need to figure out how to make another task in Android Studio, see my article on Parsing far off JSON, I made sense of how for do it exhaustively). While making this venture, utilize the Essential Movement Format or any other person you are generally alright with.
Then, associate your application to Firebase, there is more than one method for doing this however I’ll stay with the manner in which I like among others and that is involving the firebase collaborator in Android Studio (For Android Studio 2.2 or later). On the off chance that you’re utilizing a more seasoned form of Android Studio or have a more intricate undertaking setup, you can in any case physically add Firebase to your application
Associating through the Collaborator, This is the way :
1. Click on the apparatuses tab in Android Studio
2. Click on firebase
3. Click Confirmation and
4. Click Interface with firebase
After Android Studio has made the Firebase project, Snap on “Add firebase Confirmation to your venture”
Note: your framework must be online for this part. On the off chance that you’ve not done this previously, it’ll most likely request your firebase qualifications so supply it and continue.
When your task is associated with firebase, you’ll get a brief to permit firebase make changes to your gradle records, permit it and it’ll naturally add the fundamental firebase conditions to your ‘build.gradle’ document and Boooom!! Your firebase application is prepared, congratulations!!
In the event that that is as yet not satisfactory enough for you, you can track down more definite data here.
Format
We’ll make formats as necessary, this is on the grounds that we’ll have various them, it’s not right to make every one of the expected designs first prior to building. Hell on the off chance that I hadn’t proactively constructed this application I wouldn’t know the number of designs that I’ll require.
Exercises
Very much like designs, we’ll make Exercises as required, nonetheless, we’ll make another Movement right currently called PostActivity. Feel free to make another Movement, call it PostActivity.java and continue to refresh it like so:
In this action, we’ll allow clients to choose a picture from their gadget display, type a title and depiction for the post and afterward send the post. So we should plan the format of this Movement (activity_post.xml) to catch the fundamental view objects (ImageButton, EditText, and a Button).
Feel free to refresh your own format document with the code above. This Format will seem to be this in your XML visualizer
Here we have an ImageButton that permits the client to pick pictures from the display, two EditText fields to characterize the post title and depiction and a Button to present the page contents on Firebase. Genuinely basic right? presently how about we attach the PostActivity Class to deal with every one of the functionalities we need.
PostActivity.java
Here we’ll get occurrences of the view objects we made in the activity_post.xml design document, read values from them and with the assistance of the Post Button, send every one of the information to our Firebase data set.
So I’ll do a concise breakdown of what’s happening inside this class to give greater lucidity.
Inside the onCreate() strategy, we instated all the view and Firebase Articles that will be pertinent for taking care of the necessary undertaking in this Class.
Then, at that point, we set up the ImageButton to get to the client’s gadget display and pick the ideal picture for the post utilizing a goal. To get to the client’s outside stockpiling, we’ll need to request the client’s authorization to get to their gadget stockpiling by adding this line of code into the application’s manifest.xml document. Open your applications manifest.xml record and add the code beneath to it.
Then we continue to set up the post button with the end goal that after clicking it, it’ll store the page items to our Firebase information base. To accomplish this, first we “got” the qualities coming from the EditText fields and “put away” them into String factors, then, at that point, did a check to verify that the fields are not unfilled, after which we then considered an occurrence of the Firebase StorageReference where we indicated the way to store the post pictures.
Then to store the post Title and Depiction into our information base, we called a case of Firebase DatabaseReference and added a kid to it (new post) where we’ll then store every one of the qualities.
Since we have not validated clients, you’ll have to sign into your firebase control center and open the Standards tab under Information base and Stockpiling and set the Read and Compose decides to invalid so you can present information on it.
This is on the grounds that, naturally, set to bogus. This really intends that (nobody can post to it, no doubt not even you) in any case, we’ll before long be confirming clients so we’ll ultimately hinder it to bogus so that main validated clients can peruse or keep in touch with our data set.
Delivering
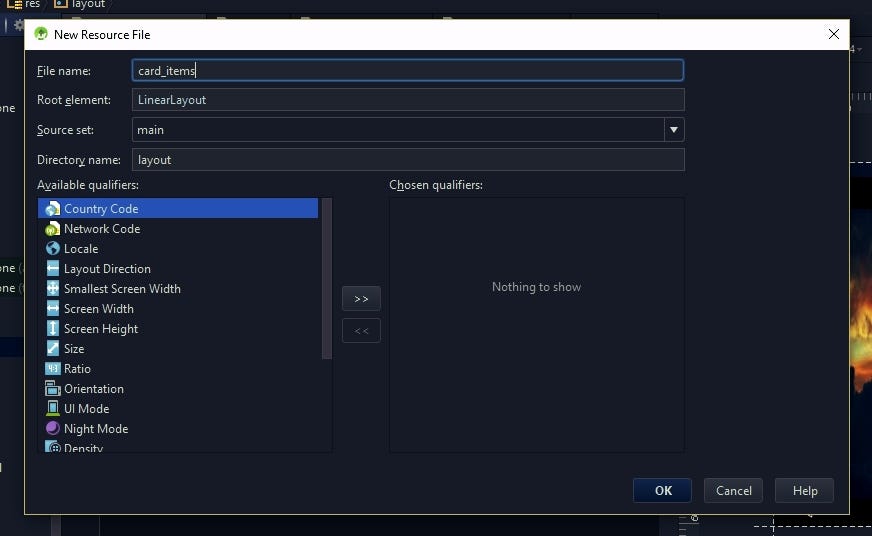
As of now we can post to Firebase, the following undertaking is to have this post show up on our landing page from where we can see them. Leading we want to make a format record that will hold the information coming from Firebase, we’ll do this with CardViews as it’ll be awesome to deal with the errand given the idea of the Application. So head on over to format in assets and make another design asset record.
Then, at that point, name the new Design document however you see fit, my case, I’ll call it card_items as it’ll hold the items in the blog entry coming from Firebase.
Then, we plan the card_items.xml record we just made to hold the post (picture, title, portrayal, and username related with the proprietor of the specific post). As you can as of now surmise, we’ll require an ImageView and three TextView objects here.
This is the Format that renders on the activity_main.xml
Presently we should continue to the MainActivity.java document and compose the code that will accomplish this ideal usefulness (to deliver the post from our information base to the characterized view objects).
Before that, we want to make a model class that will carry on like a Connector to assist us with restricting the information starting from the server to the separate view objects, consequently, make another java class called “Blogzone”.

