In this first article of the new MAD skills series on Gradle and brand new Android Gradle plugin APIs, we’ll take a look at how the Android build system works and learn the basics of Gradle.
We’ll start with Gradle’s build phases, talk about how AGP’s configuration options can help customize your builds, and what to do in order to keep your builds efficient. If you prefer this content in video form, here is something to check out:
Understanding how the build phases work and how to configure the Android Gradle plugin can help you customize your build according to your project’s needs. Let’s switch to Android Studio and see how the build system works!
Introduction to Gradle
Gradle is a general purpose build automation tool. While you can use Gradle to build Android projects, you can actually use Gradle to build any type of software.
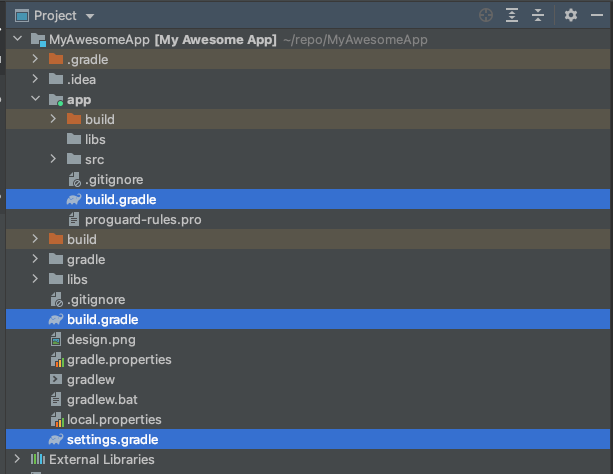
Gradle supports single or multi project builds. To configure a project to work with gradle, you need to add a build.gradle file in the project folder.
In a multi-project hierarchy, the root project consists of a settings.gradle file which lists other projects included in the build. Android uses multi project builds to help you modularize your app.


Gradle is able to work with different types of projects, such as Android or Java, because of plugins. These plugins come with pre-defined functionality to configure and build a specific type of project.
For example, to build an Android project, you need to configure your Gradle build file with the Android Gradle plugin. The Android Gradle plugin knows how to build and package an Android project, whether it is an app or library.
Tasks
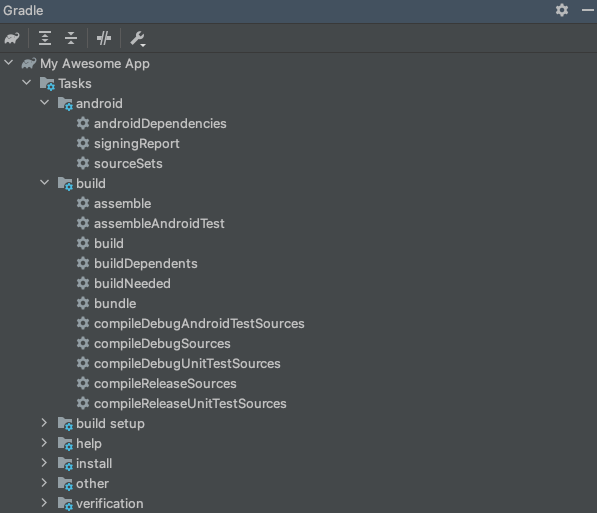
Gradle’s build process revolves around work units called Tasks. You can see the list of tasks by using the terminal or enabling the task list in the gradle pane in android studio.


These tasks receive inputs, take actions to perform some work and produce outputs as a result of the actions they performed.
The Android Gradle Plugin, defines its own tasks and knows in which order these tasks need to run to build an android project.
A Gradle build file consists of different parts. The configuration syntax is called the Gradle DSL and defines a way for developers to configure plugins. Gradle parses the android DSL block in the build.gradle file and creates AGP DSL objects such as ApplicationExtension and BuildType.
A typical Android project has a top level Gradle build file. Each module in an android project has a separate Gradle build file. In this project, I have a single app module.
In the module level build.gradle file, I need to declare and apply the plugins needed to build the project. To tell Gradle that I am building an Android project, I need to apply com.android.application or com.android.library plugins. These plugins define how to configure and build an android application or library respectively. In this case I am building an Android app project, so I need to apply com.android.application plugin. In this sample, the kotlin.android plugin is also applied, since I’ll be using Kotlin.
plugins {
    id 'com.android.application'
    id 'org.jetbrains.kotlin.android'
}
Android Gradle Plugin provides its own DSL that you can use to configure it and makes this configuration available to tasks during the build.
To configure the Android Gradle plugin, you need to use the android block. In this block you can define sdk and tools versions, application details and other configurations for different build types such as debug or release. If you want to learn more on how gradle uses this information to create variants, and what other options are available to you, check out the build documentation.
android {
    compileSdk 31

    defaultConfig {
        applicationId "com.example.myapp"
        minSdk 21
        targetSdk 31
        versionCode 1
        versionName "1.0"

        testInstrumentationRunner "androidx.test.runner.AndroidJUnitRunner"
    }

    buildTypes {
        release {
            minifyEnabled false
            proguardFiles getDefaultProguardFile('proguard-android-optimize.txt'), 'proguard-rules.pro'
        }
    }
    compileOptions {
        sourceCompatibility JavaVersion.VERSION_1_8
        targetCompatibility JavaVersion.VERSION_1_8
    }
    kotlinOptions {
        jvmTarget = '1.8'
    }
}
In the next section, you can define dependencies. Gradle’s dependency management supports Maven and Ivy compatible repositories, as well as local binaries from the filesystem.
dependencies {

    implementation 'androidx.core:core-ktx:1.7.0'
    implementation 'com.google.android.material:material:1.4.0'
    implementation 'androidx.lifecycle:lifecycle-runtime-ktx:2.4.0'
    testImplementation 'junit:junit:4.13.2'
    androidTestImplementation 'androidx.test.ext:junit:1.1.3'
    androidTestImplementation 'androidx.test.espresso:espresso-core:3.4.0'

}
Build Phases
Gradle evaluates and runs the build in three phases. Initialization, Configuration and Execution.
In the Initialization phase Gradle decides which projects are included in the build, and creates a Project instance for each of these projects. To decide which projects are included in the build, Gradle first looks for the settings.gradle file to decide between a single project build or multi project build.
In the Configuration phase Gradle evaluates all build scripts for the projects included in the build, applies plugins, configures the build using DSL objects and finally registers tasks as well as their inputs lazily.
Note that the configuration phase runs regardless of which task is requested to run. To keep your builds short and efficient, avoid performing any time consuming operations in the configuration phase.
Finally, in the Execution phase Gradle executes the set of tasks needed for the build.
We’ll take a closer look at these phases in the next articles while writing our own plugin.
Gradle DSL supports Groovy and Kotlin scripts for build files. So far I used Groovy DSL scripts to configure this project’s build. You can see the same build file below in Kotlin and in Groovy script side by side. Notice the file name for the kotlin script has .kts suffix.

Moving from groovy to Kotlin or the other way, doesn’t change how you execute a task.
Summary
That’s it, well at least for this article. Gradle and Android Gradle Plugin have many capabilities that allow you to customize your builds. In this article you’ve learned about basics of Gradle tasks, build phases, how to configure AGP and using the DSL to customize your build.
Next you’ll see how to use AGP’s Variant API to extend your build by writing your own plugin.
[“source=medium”]


